
Introduction
Have you ever had a tough time bringing your website to the top of Google search results? Have you or your users ever seen this annoying screen when you or they visit your website?
“Your connection to this website is not secure”

You might already know that these two problems are most likely a result of you not having an SSL/TLS certificate for your domain name. You might have already visited some hosting service provider and would have jumped in your seat on seeing the pricing to purchase an ssl certificate. What if you could get a free SSL Certificate for your domain name with all the important security features you need? Let’s see how –
There are a few ways to do that.
1. Self Signed SSL Certificate: You can create and secure your connection using OpenSSL, but the only problem with this method is, as the Certificate is not signed by any of your browser’s trusted certificate authorities, you will see something like below in your browser:

2. Let’s Encrypt: It is a nonprofit Certificate Authority. Many hosting providers provide integration support, and you can integrate free SSL. But not all hosting/domain services do. Still, you can do it manually, but the problem is Let’s Encrypt provide a Certificate for 90 days only, and you have to renew it again after 90 days for free.
3. Cloudflare: It provides CDN, security firewall, DNS, SSL Certifcate, and a lot more, and that’s too for free.
Cloudflare
Cloudflare provides a lot of excellent features for free. We are going to discuss SSL setup in this article.
Cloudflare also provides an external DNS service, so if you have a domain name with any service provider still, you can use Cloudflare as DNS. Cloudflare also provides a SSL Certificate for free. It provides a bunch of different options to select.

- Flexible: All the traffic from the browser to the Cloudflare will be secure, but Cloudflare to the origin server will be on HTTP only and not HTTPS. Flexible mode is good enough if your website does not handle sensitive data. Do not require any extra effort to enable this method. You need to enable this from the Cloudflare SSL dashboard, and you are done.
- Full: End-to-end encryption, all the traffic from the browser to the origin server is secure.
- Full (strict): It is the same as Full, but the only difference is that the connection between Cloudflare to the origin server is secure with trusted CA or Cloudflare Origin CA. We will see how to set up this method in the latter part of the article.
Prerequisite
- a VM (virtual machine) with NGINX running on any hosting service such as GCP, AWS, Azure, etc.
- Cloudflare account it’s free to create.
- A domain name, such as
example.com, setup DNS on Cloudflare to point the Nginx Server. Refer to docs to setup DNS on Cloudflare: https://developers.cloudflare.com/dns/
1. Create an Origin Certificate
Cloudflare offers you to create a SSL Certificate at no cost, which you can install on the Nginx Server. This Certificate will secure the connection between Cloudflare and the origin server.
Go to the SSL/TLS section, select Origin Server, and click on Create Certificate.

Click on Create to generate the SSL Certificate. You should not remove *.example.com for wildcard ssl certificate support which will help you to create a subdomin using the same certificate

Now the Certificate is created, you need to install this on your origin server. Keep a copy of your Private Key in a safe place. Once OK is pressed, you can not reaccess the Private Key.

First copy Origin Certificate to /etc/ssl/certs/cert.pem on your server.
|
1 |
$ sudo nano /etc/ssl/certs/cert.pem |
Then copy the Private Key to /etc/ssl/private/key.pem on your server.
|
1 |
$ sudo nano /etc/ssl/private/key.pem |
Note: Sometimes, an extra line is added while pasting. Check for any additional lines left at the top of the file. The Nginx configuration test will fail otherwise.
2. Configure Nginx
We have created the Certificate and Private Key and copied them to the server. The next step is to configure the Nginx.
Next, open the Nginx configuration file:
|
1 |
$ sudo nano /etc/nginx/sites-available/example.com |
For example Nginx configuration, your config may be different.
|
1 2 3 4 5 6 7 8 9 10 11 |
server { listen 80; listen [::]:80; server_name example.com www.example.com; location / { include proxy_params; proxy_pass http://localhost:3000/; } } |
Let’s modify it to handle the requests on port 443 to use the HTTPS protocol.
We will change port 80 to 443 and add ssl_certificate and ssl_certificate_key directive to the configuration. I am removing port 80 and redirecting the http request to HTTPS from Cloudflare.
|
1 2 3 4 5 6 7 8 9 10 |
server { listen 443; listen [::]:443; ssl_certificate /etc/ssl/certs/cert.pem; ssl_certificate_key /etc/ssl/private/key.pem; server_name example.com www.example.com; location / { include proxy_params; proxy_pass http://localhost:3000/; } } |
Save the file and run the test.
|
1 |
$ sudo nginx -t |
If the test is passed, then restart the Nginx server to enable the change
|
1 |
$ sudo systemctl restart nginx |
Next, go to the SSL/TLS section and select Overview, and select the Full (strict) option

Go to the SSL/TLS section, select Edge Certificate, and enable the Always Use HTTPS option. This will redirect all the HTTP requests to HTTPS

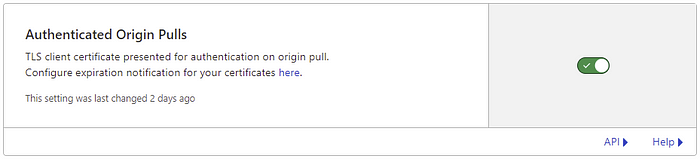
3. Setup Authenticated Origin Pull
Authenticated Origin Pulls will ensure that the request comes through Cloudflare to sever and not directly to the origin server.
Authenticated Origin Pulls allow you to cryptographically verify that requests to your origin server have come from Cloudflare using a TLS client certificate. This prevents clients from sending requests directly to your origin, bypassing security measures provided by Cloudflare, such as IP and Web Application Firewalls, logging, and encryption.
Refer to More: https://developers.cloudflare.com/ssl/origin-configuration/authenticated-origin-pull/
We need to add the Cloudflare TLS client certificate to our Nginx server:
|
1 2 3 4 5 6 7 8 9 10 11 12 13 14 15 16 17 18 19 20 21 22 23 24 25 26 27 28 29 30 31 32 33 34 35 |
-----BEGIN CERTIFICATE----- MIIGCjCCA/KgAwIBAgIIV5G6lVbCLmEwDQYJKoZIhvcNAQENBQAwgZAxCzAJBgNV BAYTAlVTMRkwFwYDVQQKExBDbG91ZEZsYXJlLCBJbmMuMRQwEgYDVQQLEwtPcmln aW4gUHVsbDEWMBQGA1UEBxMNU2FuIEZyYW5jaXNjbzETMBEGA1UECBMKQ2FsaWZv cm5pYTEjMCEGA1UEAxMab3JpZ2luLXB1bGwuY2xvdWRmbGFyZS5uZXQwHhcNMTkx MDEwMTg0NTAwWhcNMjkxMTAxMTcwMDAwWjCBkDELMAkGA1UEBhMCVVMxGTAXBgNV BAoTEENsb3VkRmxhcmUsIEluYy4xFDASBgNVBAsTC09yaWdpbiBQdWxsMRYwFAYD VQQHEw1TYW4gRnJhbmNpc2NvMRMwEQYDVQQIEwpDYWxpZm9ybmlhMSMwIQYDVQQD ExpvcmlnaW4tcHVsbC5jbG91ZGZsYXJlLm5ldDCCAiIwDQYJKoZIhvcNAQEBBQAD ggIPADCCAgoCggIBAN2y2zojYfl0bKfhp0AJBFeV+jQqbCw3sHmvEPwLmqDLqynI 42tZXR5y914ZB9ZrwbL/K5O46exd/LujJnV2b3dzcx5rtiQzso0xzljqbnbQT20e ihx/WrF4OkZKydZzsdaJsWAPuplDH5P7J82q3re88jQdgE5hqjqFZ3clCG7lxoBw hLaazm3NJJlUfzdk97ouRvnFGAuXd5cQVx8jYOOeU60sWqmMe4QHdOvpqB91bJoY QSKVFjUgHeTpN8tNpKJfb9LIn3pun3bC9NKNHtRKMNX3Kl/sAPq7q/AlndvA2Kw3 Dkum2mHQUGdzVHqcOgea9BGjLK2h7SuX93zTWL02u799dr6Xkrad/WShHchfjjRn aL35niJUDr02YJtPgxWObsrfOU63B8juLUphW/4BOjjJyAG5l9j1//aUGEi/sEe5 lqVv0P78QrxoxR+MMXiJwQab5FB8TG/ac6mRHgF9CmkX90uaRh+OC07XjTdfSKGR PpM9hB2ZhLol/nf8qmoLdoD5HvODZuKu2+muKeVHXgw2/A6wM7OwrinxZiyBk5Hh CvaADH7PZpU6z/zv5NU5HSvXiKtCzFuDu4/Zfi34RfHXeCUfHAb4KfNRXJwMsxUa +4ZpSAX2G6RnGU5meuXpU5/V+DQJp/e69XyyY6RXDoMywaEFlIlXBqjRRA2pAgMB AAGjZjBkMA4GA1UdDwEB/wQEAwIBBjASBgNVHRMBAf8ECDAGAQH/AgECMB0GA1Ud DgQWBBRDWUsraYuA4REzalfNVzjann3F6zAfBgNVHSMEGDAWgBRDWUsraYuA4REz alfNVzjann3F6zANBgkqhkiG9w0BAQ0FAAOCAgEAkQ+T9nqcSlAuW/90DeYmQOW1 QhqOor5psBEGvxbNGV2hdLJY8h6QUq48BCevcMChg/L1CkznBNI40i3/6heDn3IS zVEwXKf34pPFCACWVMZxbQjkNRTiH8iRur9EsaNQ5oXCPJkhwg2+IFyoPAAYURoX VcI9SCDUa45clmYHJ/XYwV1icGVI8/9b2JUqklnOTa5tugwIUi5sTfipNcJXHhgz 6BKYDl0/UP0lLKbsUETXeTGDiDpxZYIgbcFrRDDkHC6BSvdWVEiH5b9mH2BON60z 0O0j8EEKTwi9jnafVtZQXP/D8yoVowdFDjXcKkOPF/1gIh9qrFR6GdoPVgB3SkLc 5ulBqZaCHm563jsvWb/kXJnlFxW+1bsO9BDD6DweBcGdNurgmH625wBXksSdD7y/ fakk8DagjbjKShYlPEFOAqEcliwjF45eabL0t27MJV61O/jHzHL3dknXeE4BDa2j bA+JbyJeUMtU7KMsxvx82RmhqBEJJDBCJ3scVptvhDMRrtqDBW5JShxoAOcpFQGm iYWicn46nPDjgTU0bX1ZPpTpryXbvciVL5RkVBuyX2ntcOLDPlZWgxZCBp96x07F AnOzKgZk4RzZPNAxCXERVxajn/FLcOhglVAKo5H0ac+AitlQ0ip55D2/mf8o72tM fVQ6VpyjEXdiIXWUq/o= -----END CERTIFICATE----- |
You can also download the Certificate from here.
Copy the above Certificate to /etc/ssl/certs/cloudflare.crt on your server.
|
1 |
$ sudo nano /etc/ssl/certs/cloudflare.crt |
Now add ssl_verify_client and ssl_client_certificate directives to Nginx configuration.
|
1 2 3 4 5 6 7 8 9 10 11 |
server { listen 443; listen [::]:443; ssl_certificate /etc/ssl/certs/cert.pem; ssl_certificate_key /etc/ssl/private/key.pem; ssl_verify_client on; ssl_client_certificate /etc/ssl/certs/cloudflare.crt; server_name example.com www.example.com; location / { include proxy_params; proxy_pass http://localhost:3000/; } } |
Save the configuration and test the for syntax error, then restart the server:
|
1 2 |
$ sudo nginx -t $ sudo systemctl restart nginx |
Finally, enable the Authenticated Origin Pulls, go to the SSL/TLS section and select Origin Server, then enable it:
Now, to check if everything works, enter your domain https://example.com in the browser to verify setup.
Now I hope you will not purchase ssl certificate.

Feedback
That’s all for Today’s Post. If you have any questions, please let me know in the comments. Also, if you found any errors in the post, please write to me at [email protected].
If you want me to cover some specific topics in the upcoming posts, please let me know in the comments.
Follow me:
Thank you for your the time to read this article. Please share it if you like.